General Sno*Jet Parts and Information
* If you need parts for your Sno*Jet, you've got a few options:
Parts and Adverising on www.snojet.com
If you're looking for parts, sled, info, there is also a lot of information on Facebook.
The black trim piece that goes around the back of the hood can be found at any Case Tractor Dealership. The reflectors for the tunnel and hood can be found
at any Bumper to Bumper store.
Slide suspension track clips, kimpex #04-150-01, .745 x 2" same as Bombardier. The track for bogie suspensions has narrower clips.
Metal insert nuts used in the plywood for seats usually rust out and rot the plywood. They can be bought at Rona, or most other hardware stores, #10-24 threads.
72 SST decal position at the rear of the tunnel is 1 1/8" from the top, and 1 1/2" on each side. 72 SST decal measurements are 12" long and 3 3/4" high. 72/73 SST, the reflectors are 2 3/4" long x 1 1/8" high. 74 Astro SS reflectors are bigger, 3 1/4" long x 1 1/2" high. They can be bought at Canadian Tire. Part number 020-3322-8 (B178 SAW) Yellow. 020-3323-6 (B178 SRW) red. 72/73 SST speedo cable measures 41" long. Taiwan reproductions are available, part number 005-087.
74 Astro SS speedo cable measures 75", cat cables will work.
73 SST and 74 Astro SS fuel tank cap with gauge should be 12.5" long, kimpex #278928 or Royal Distributing #07-287-19
72/73/74 rubber foot pad, try using a floor mat from a 2001 Ford F150, it has the same grain, cut and make the pads yourself.
Rubber foot pads, similar to original, the company name is Centura (carpet store), model ProTekt.
Decal kits, Intech Graphics
Hood straps, sno-flaps, passenger grips are around, but you'll need to contact me for more info.
For skis, kimpex #08-302 but they've been discontinued.
Snojet side decals, for 72 they are 16 1/4" long, 73 and 74 they are 15" long, but the lettering is slightly different. The 74 decals are also reflective.
72 SST, choke button or knob, Canadian Tire #024-5430-0 is similar, it can be made to fit.
Sno*Jet Repair Blog
Roland Leblanc has setup a blog following the clean-up and refurbishement of a 1970 Sno-Jet Super Sport. Follow the link for details and pictures of the sled. There is some good information on the blog on what to expect when tackling an older Sno-Jet Project.
http://rolandleblanc.wordpress.com/
Sno*Jet Carb Rebuild
Gary Kist has provided a video on the Disassembly of a Keihin Carb for a 74 SST 292. Take a look.
Track and Suspension Information
Please Note: Even with all the information listed below, please do your research before purchasing or making any modifications to your existing setup. There are a lot of variables to take into account, but almost anything can be made to work properly.
If your track is too worn, you've got a few different options. There are instructions on replacing your track with a newer 121" track. The original kimpex track replacements (04-660 for the 72-74 sleds, 04-661 for the 75-77 SST's and Astro SS's)
have been discontinued, BUT Camoplast and Kimpex have tracks that will work with little modifications. Look up the Kimpex 04-932K
and the Camoplast 115-755/115-754 (Durasport 530), but make sure to do your research.
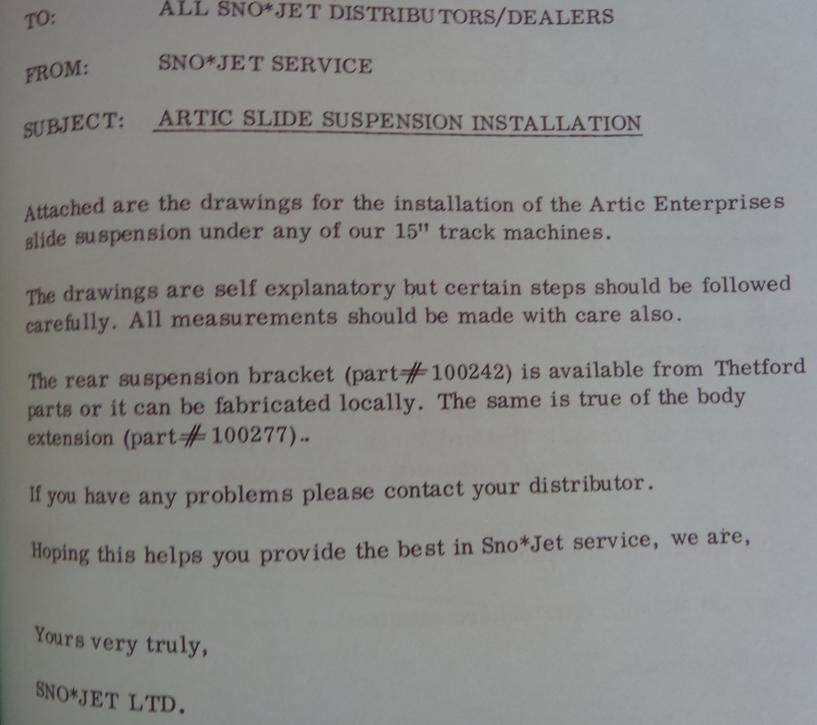
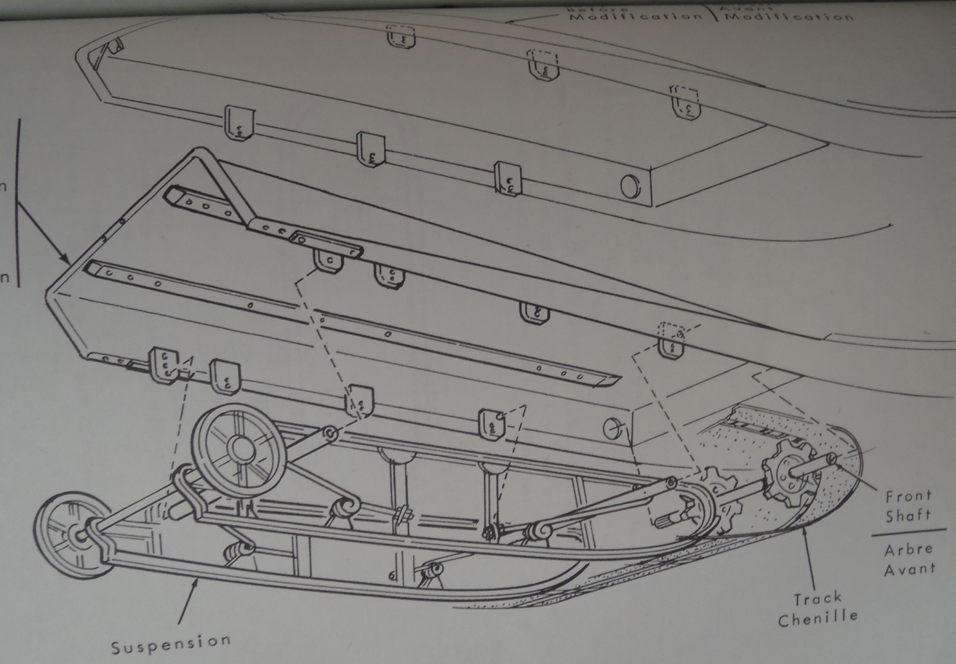
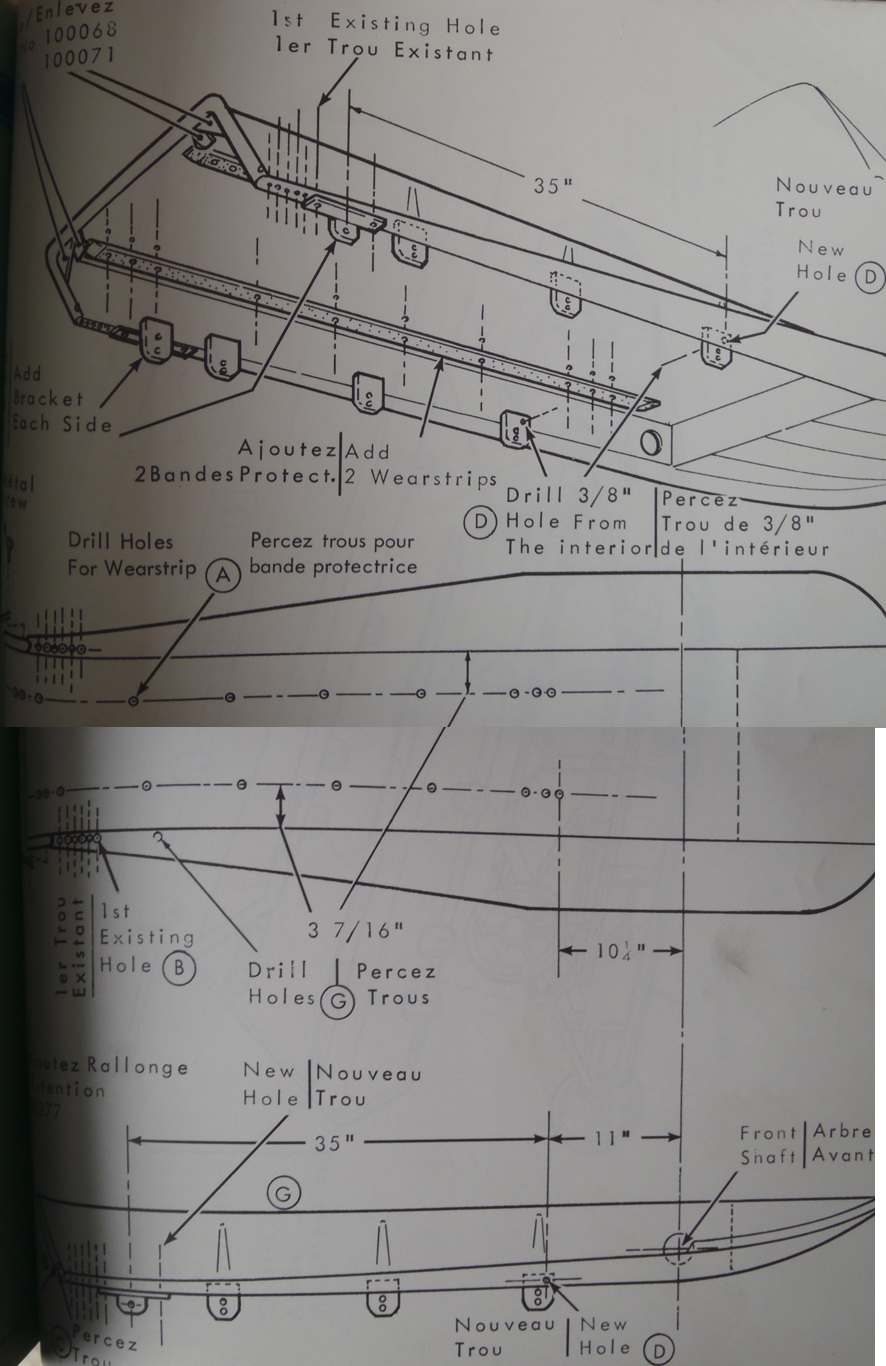
How to put a Cat Slide Suspension in your Sno*Jet - Part 1
How to put a Cat Slide Suspension in your Sno*Jet - Part 2
How to put a Cat Slide Suspension in your Sno*Jet - Part 3
How to get extra travel out of your 75/76 suspension
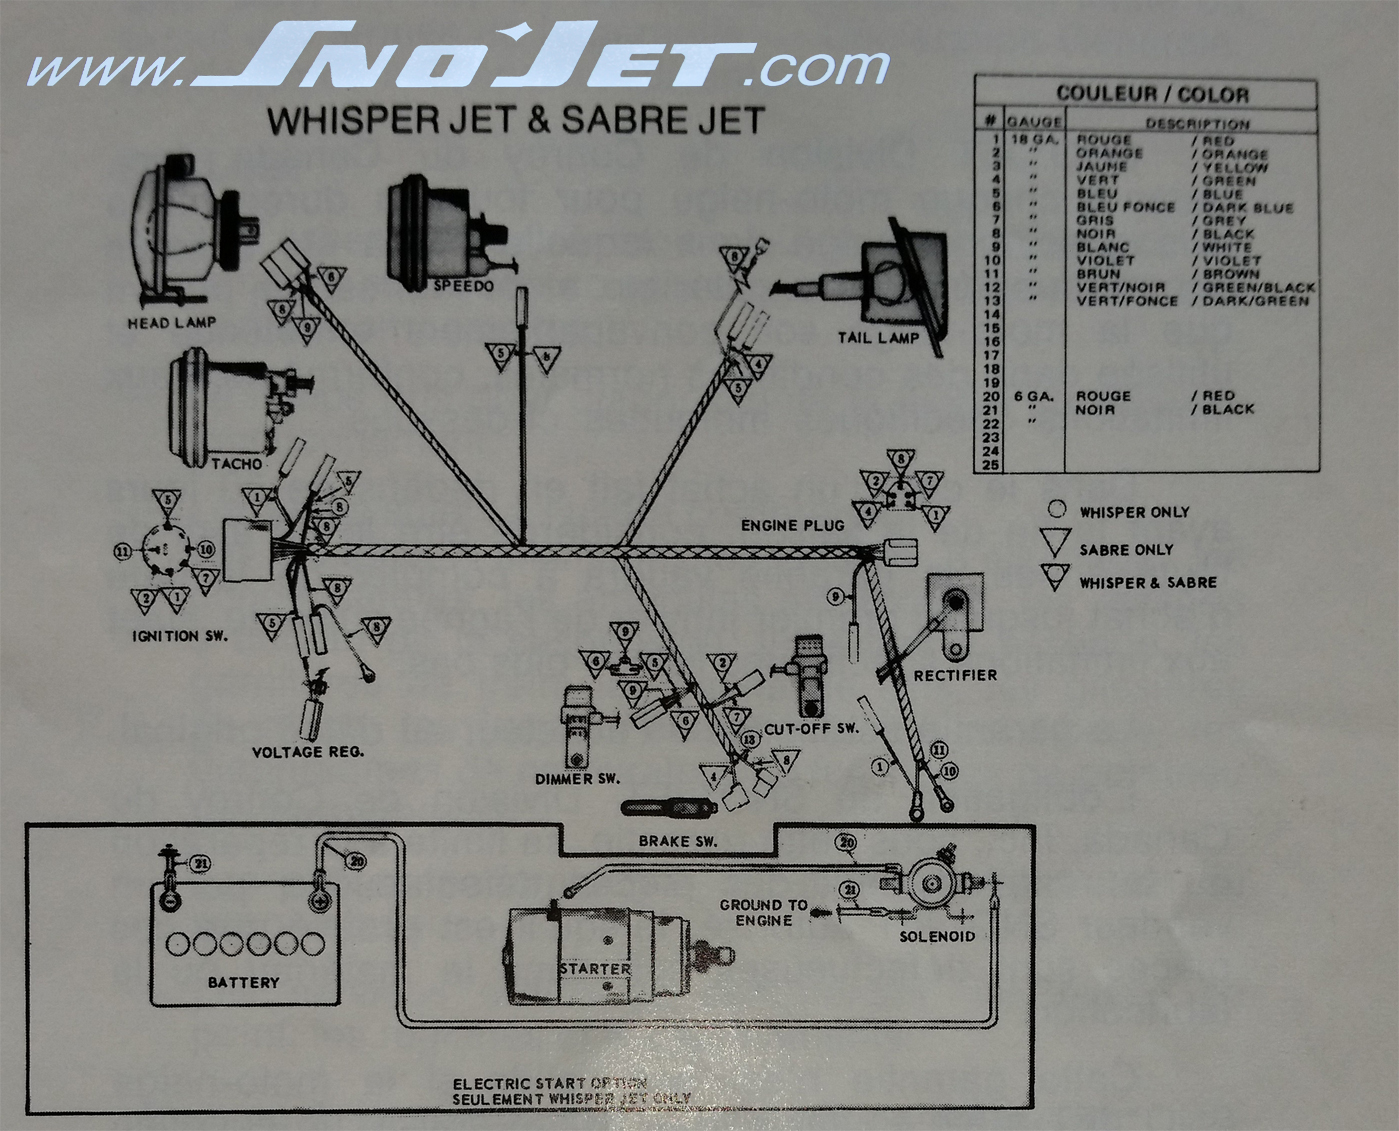
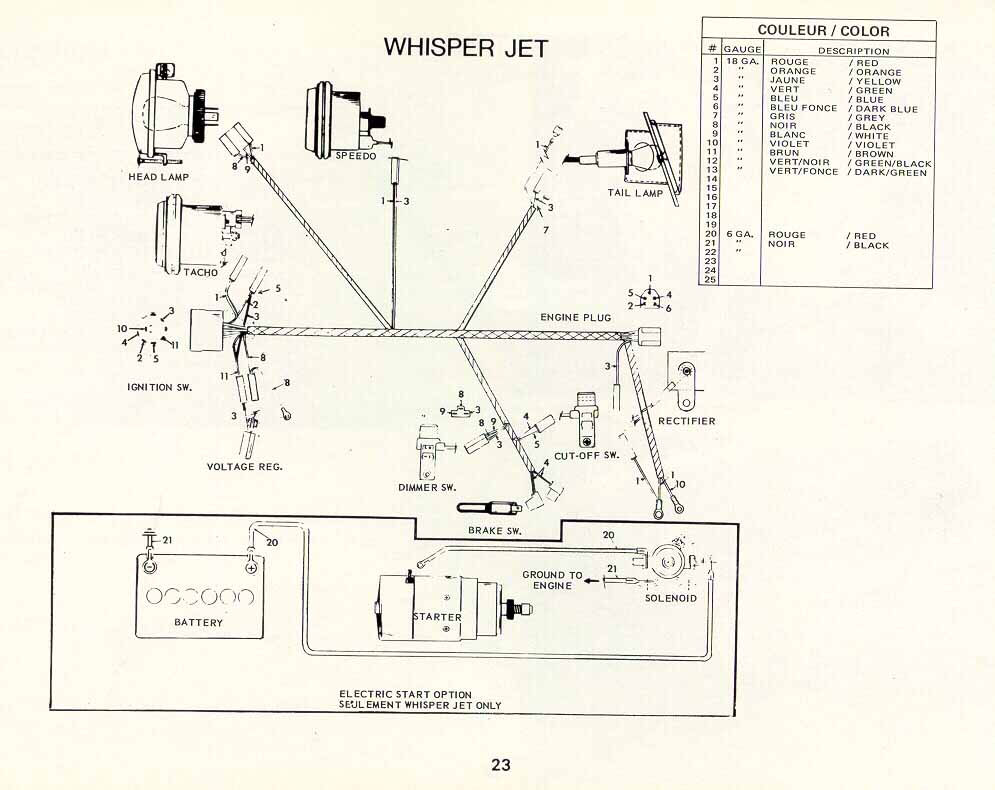
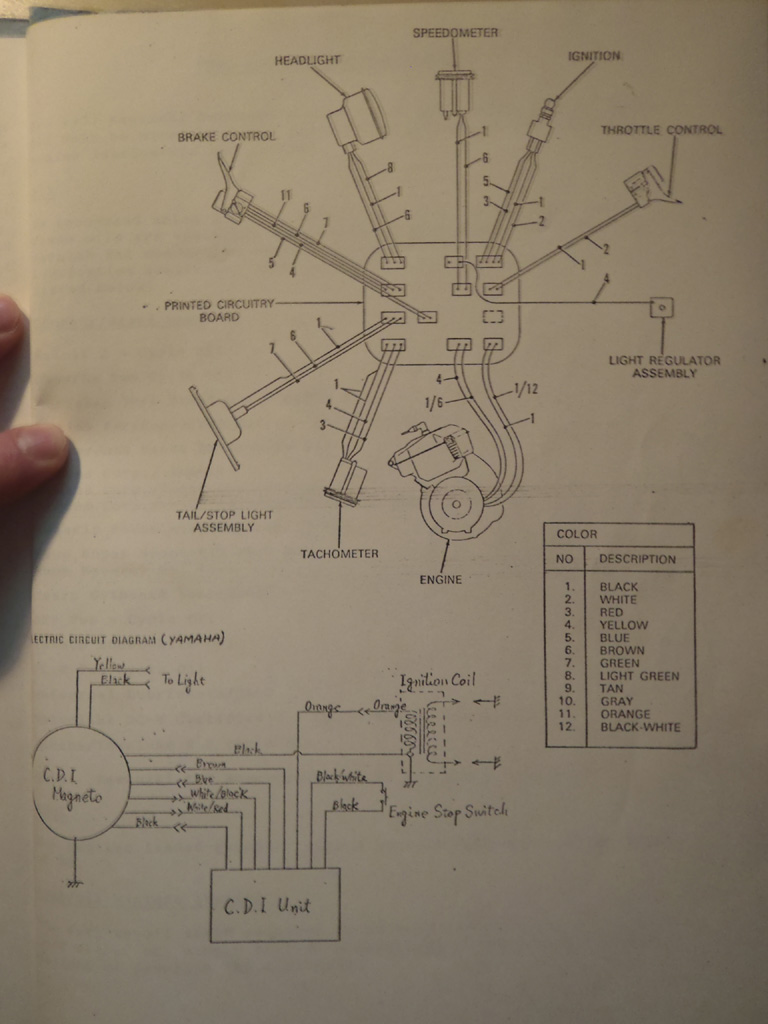
1974 Whisper Jet and Sabre Jet
1972 Owners Manual PDF provided by Tim Reil
If you decide to repaint the sled yourself, you may have a hard time
picking a color. If your sled is faded, you'll have a hard time getting the
correct color scanned. Here are a few different types of paint submitted by viewers that you might want to
try. They all should be very close, but its up to you. Just as a warning, Sno*Jet did have several different shades of blue, they were always tweaking the color. So make sure to compare any new paint with the original on your sled.
Please Note: The quality of paint makes a huge difference. While using generic spray paint can be really easy and cheap, its not the best quality wise. One option is to have a proper high quality paint mixed and put into spray cans. This is a better option, but generally when using a spray can, you just can't lay it on as thick as a proffesional paint job. Review all your options.
Also note, I have not had a chance to try out all these different combinations, they were all submitted from viewers like yourself.
Sno*Jet Blue
* 1974 Porche Color, specifically Mexico Blue Code Number 336
A friend found a NOS hood for a 72 Super Jet, he had the hood scanned and this is the information
to have it mixed up yourself.
1 US Quart
Go to your facebook, look up the group Sno Jet Snowmobiles or Sno*Jet.
There are several other groups for various vintage sleds on facebook. Good luck!
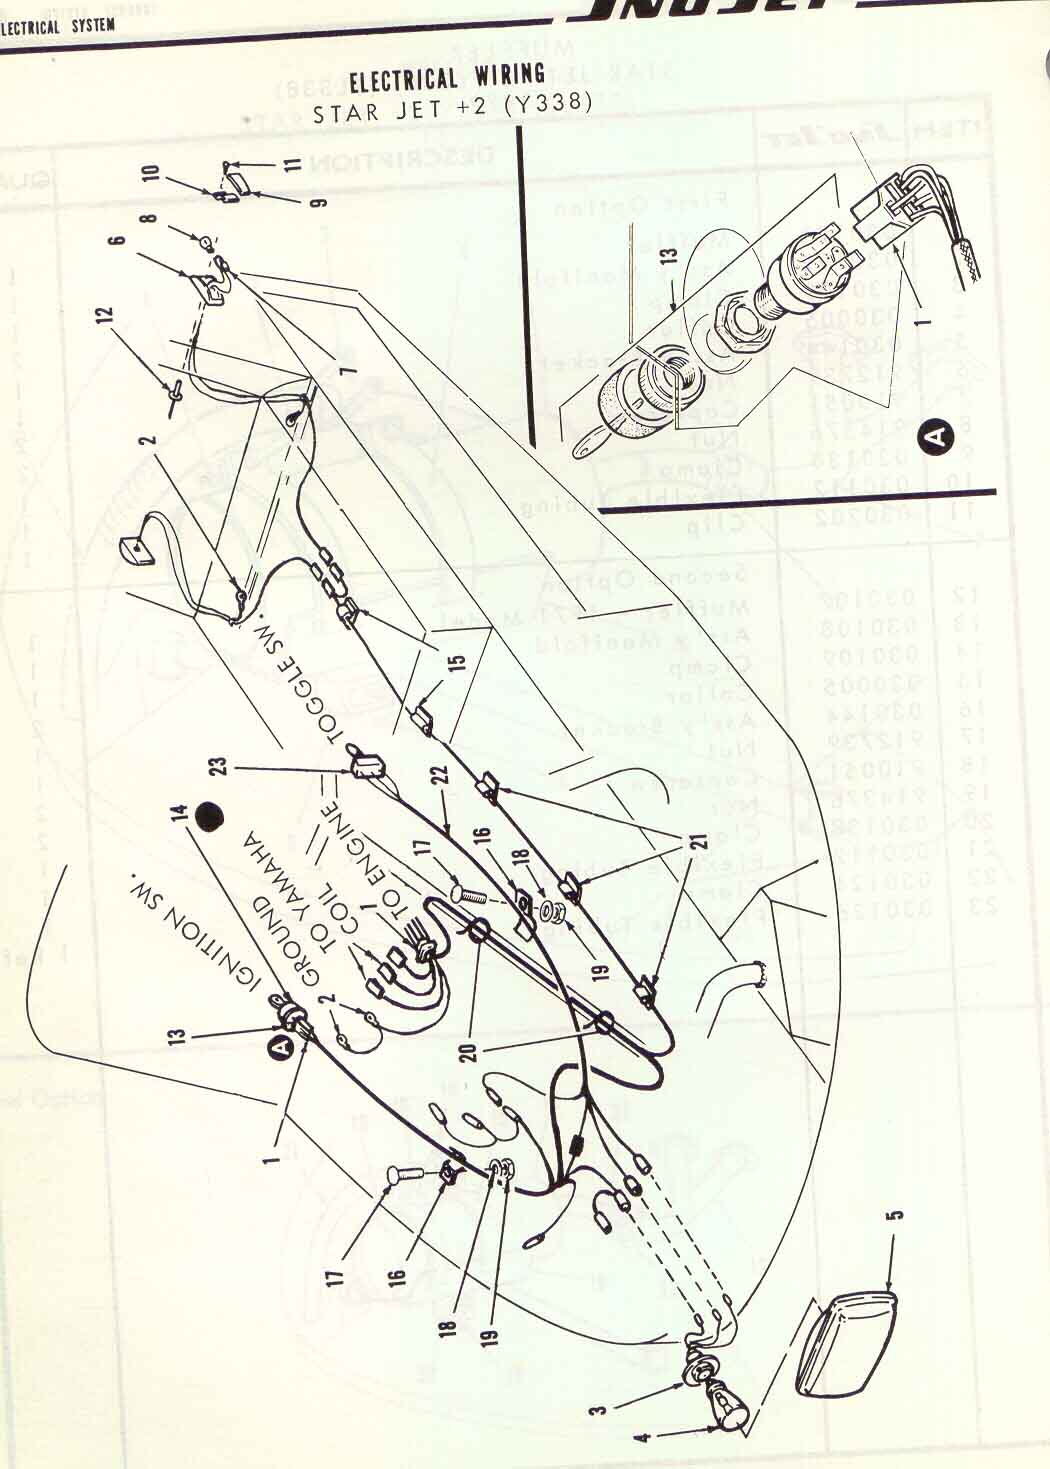
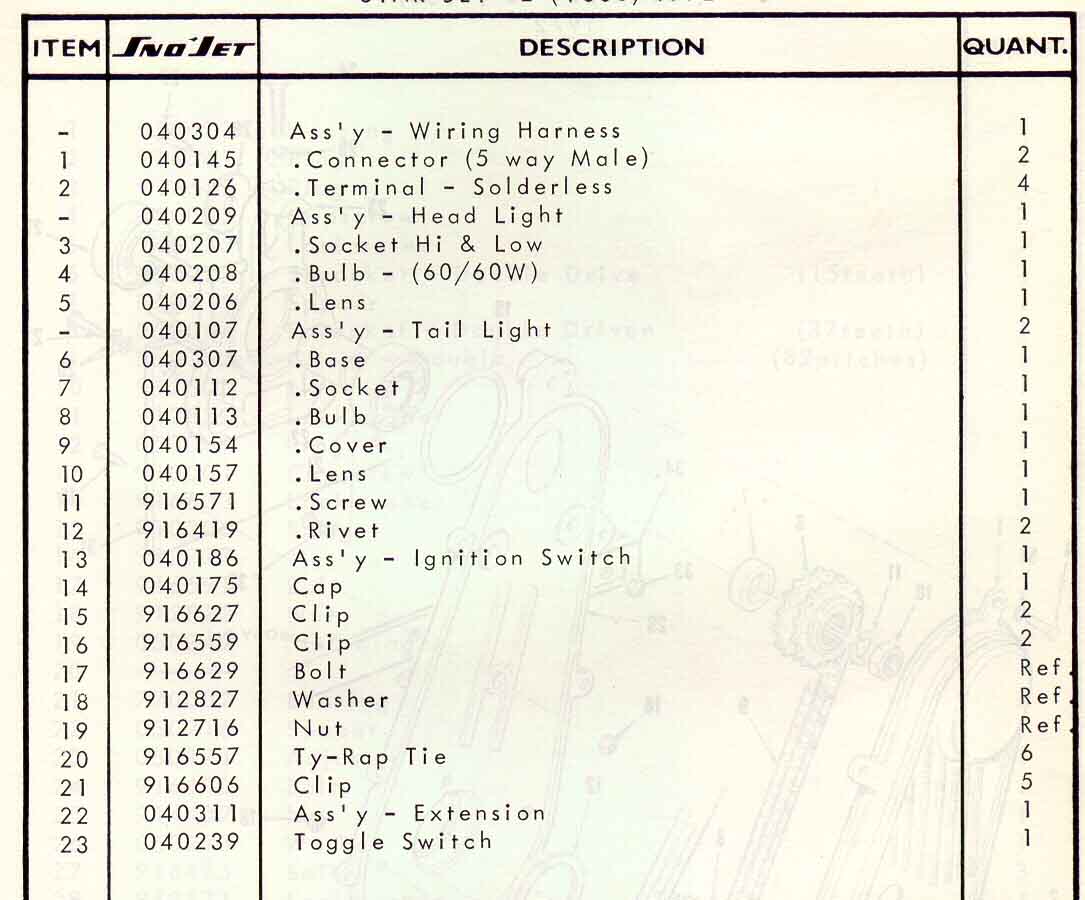
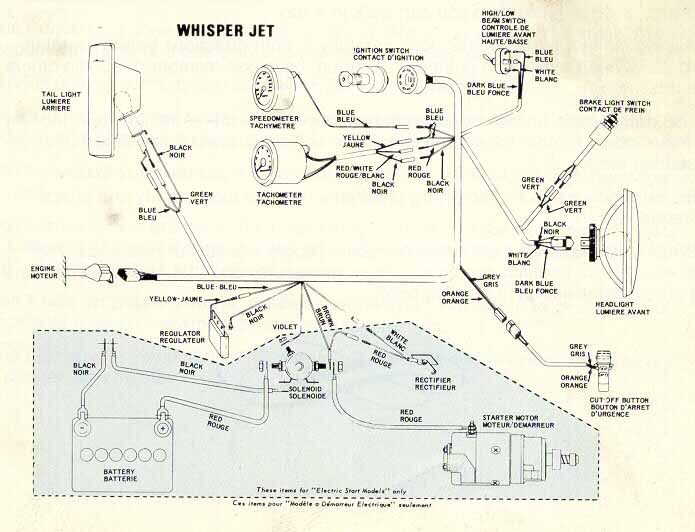
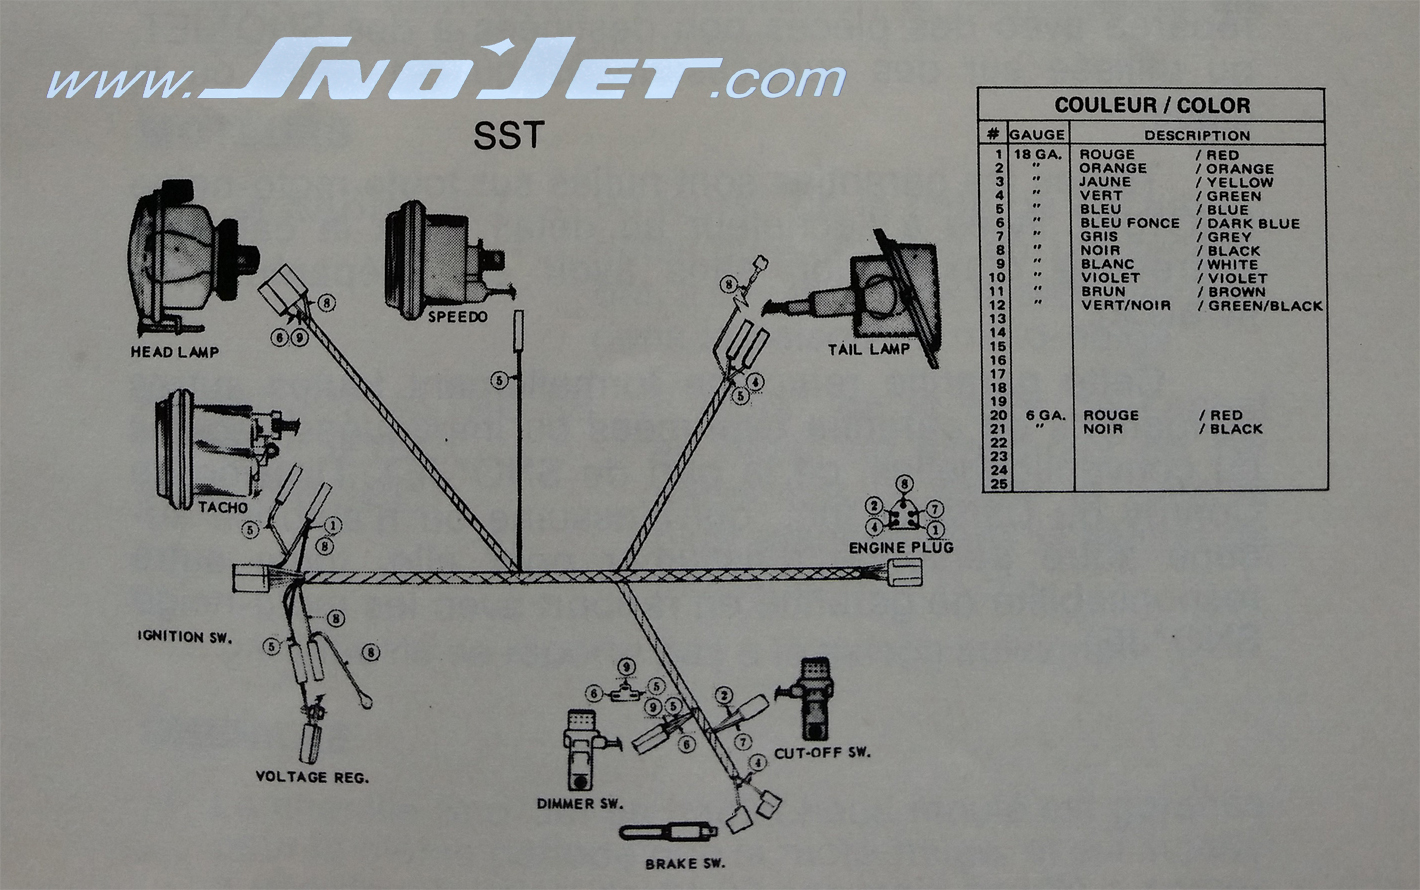
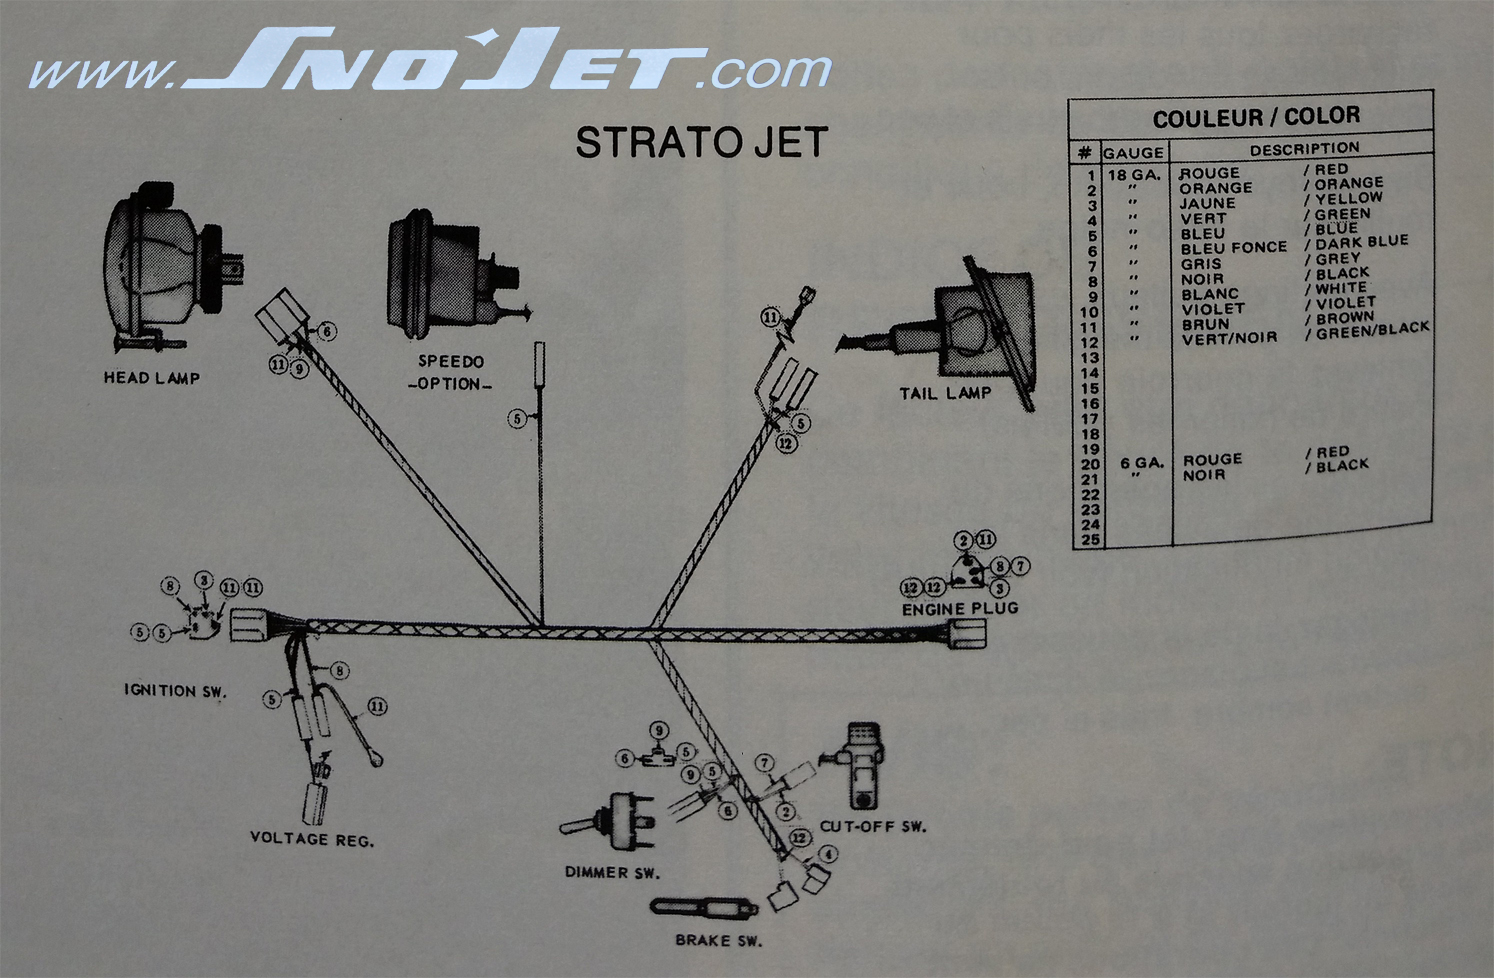
These diagrams were generally available in the owners manual. I don't list the older diagrams because they weren't very helpful,
it was more of a layout on how the wiring went in the sled, it didn't have any info on the colors. The good news is most of the older models were pretty basic when it came to wiring.
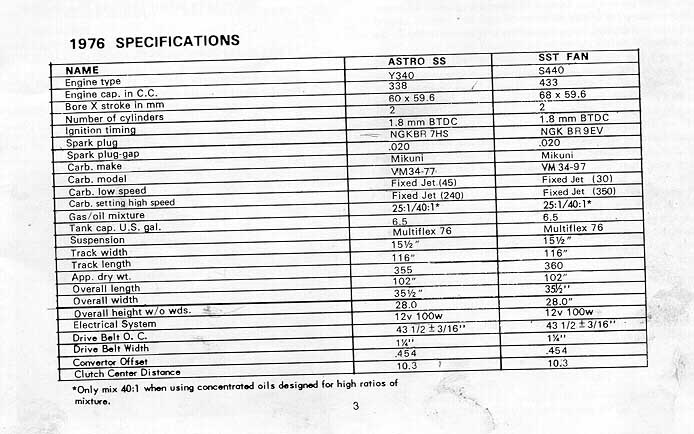
This information comes right out of the owners manuals, it comes in pretty handy.
Does your sled need a new belt? There have been many changes to the different belts over the years.
Here is a quick conversion for a few different Sno-Jets so you can run a new Kimpex belt.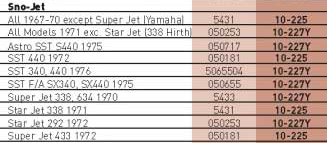
It is very difficult to find nice original windshields. Sno-Stuff has been making aftermarket windshields for years, but they are still tough to find.
Here is a quick list for a few different Sno-Jets. Good luck! Once a proper reproduction option is available, I will list the details.
* Tremclad Rust Paint Medium Blue
* Canadian Tire Moto-master # 47-5044
* Rust-Oleum Sail Blue # 7724
* Sno*Jet Blue Ditzler #14231
* 1971 Ford Grabber Blue
* "Fleet Hot Licks Super Blue" Paint number 17708
Take this information to an auto parts store that deals with PPG paints.
| SKU | Increment | Total |
| M121 | 313.4 | 313.4 |
| M119 | 155.3 | 468.7 |
| M112NF | 13.4 | 482.1 |
| M118 | 6.6 | 488.7 |
| M102 | 17.7 | 506.4 |
| M103 | 487.8 | 994.2 |
4 parts paint, 1 part hardener, optional 10% reducer. After drying, you can apply a clear coat. For a really nice finish, you'll need to wetsand and polish.
Here are a couple paint codes for a Polyurethane Paint. They were proffesionally scanned and should be an exact copy.
Solid Blue 196030 ESSS-B- Code 60845
Hirth Engine Blue - Metalic blue 104420 ESSS-B- Code 20430
Gold Thunder Jet Tunnel Color
* YM026 K-Chromabase BC Spectramaster Yellow. Also make sure you use something like VarPrime 615S Self-Etching Primer under it or it will just peel back off
* rm paint code number is m6078i color max
Here are a couple up to date color codes for the 74/75 Tjet that work for the newer water borne paints. I believe the paint is Dupont water borne. The Blue for the hood/pan, colour scanned from the Lee Fredrickson re-pop hoods (which I'm told by others is correct color), info here is taken from the paint can:
200348CP 1 CV01 Cromax pro WBC
Color: TUAREGBLAU
Code 234
WB2010 WB01 WB28 WB07
90.86% 6.27% 1.89% 0.98%
The Gold for the Tunnel - colour scanned from an original and clean section of the gold anodized tunnel
751303CP 3 CV01 Cromax pro WBC
Color: GOLDISH BEIGE - Effect
Code 67U
FORMULA CONTAINS WB33 (TARGET HAP)
WB2010 WB2030 WB1009 WB1031 WB1030 WB90 WB06 WB53 WB1007 WB33
5.11% 1.28% 24.66% 20.48% 20.48% 19.18% 3.02% 2.15% 2.09% 1.54%
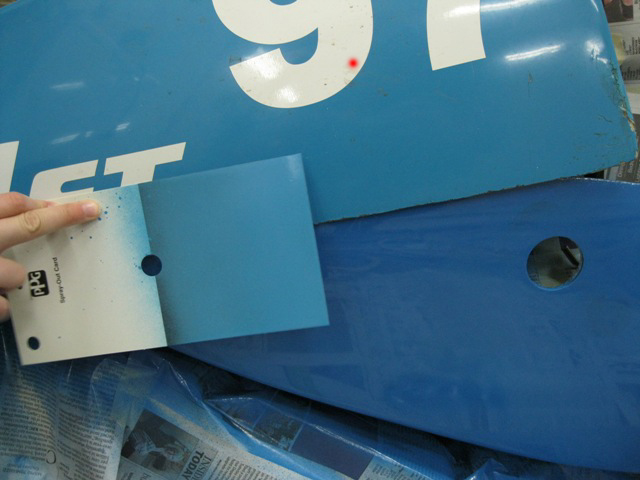
Here's a new update on the Sno*Jet colors. Look at the image below.
That is a 73 Thunder Jet, the hood (top part) is the original gel-coat.
The bellypan (bottom piece) is Tremclad Medium Blue, and the color sample in the middle is Porsche Mexico Blue.
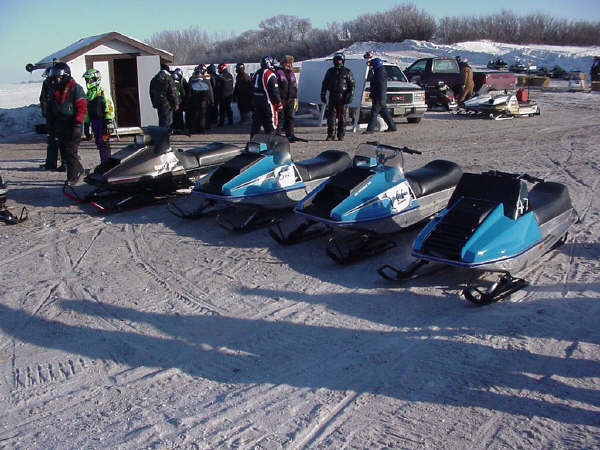
The Sno*Jet on the Right was painted with 1974 Porsche Color, Mexico Blue.
The one beside it was painted with Tremclad Medium Blue, and a Tremclad Clear Coat.
The Sno*Jet beside it still has the original gel coat.
So you've got an old Sno-Jet with the gas tank mounted in the tunnel. These can be problematic when they start to rust. They'll clog up your fuel filters and be a complete hassle. There are a couple options:
You could clean the tank using various chemicals, strip it right down to the metal, then look for a product called Red-Kote. It allows you to coat the inside of your gas tank, preventing any rust in the future. I haven't tried this yet, but have heard good things about the product.
I've seen cases where people will cut out an access hole in the top of the tank. From there they can properly see the rust and do any necessary repairs. One option would be to sandblast the inside of the tank. From there you can either re-seal the hole you cut, or mount a cover, just make sure it is sealed up properly.
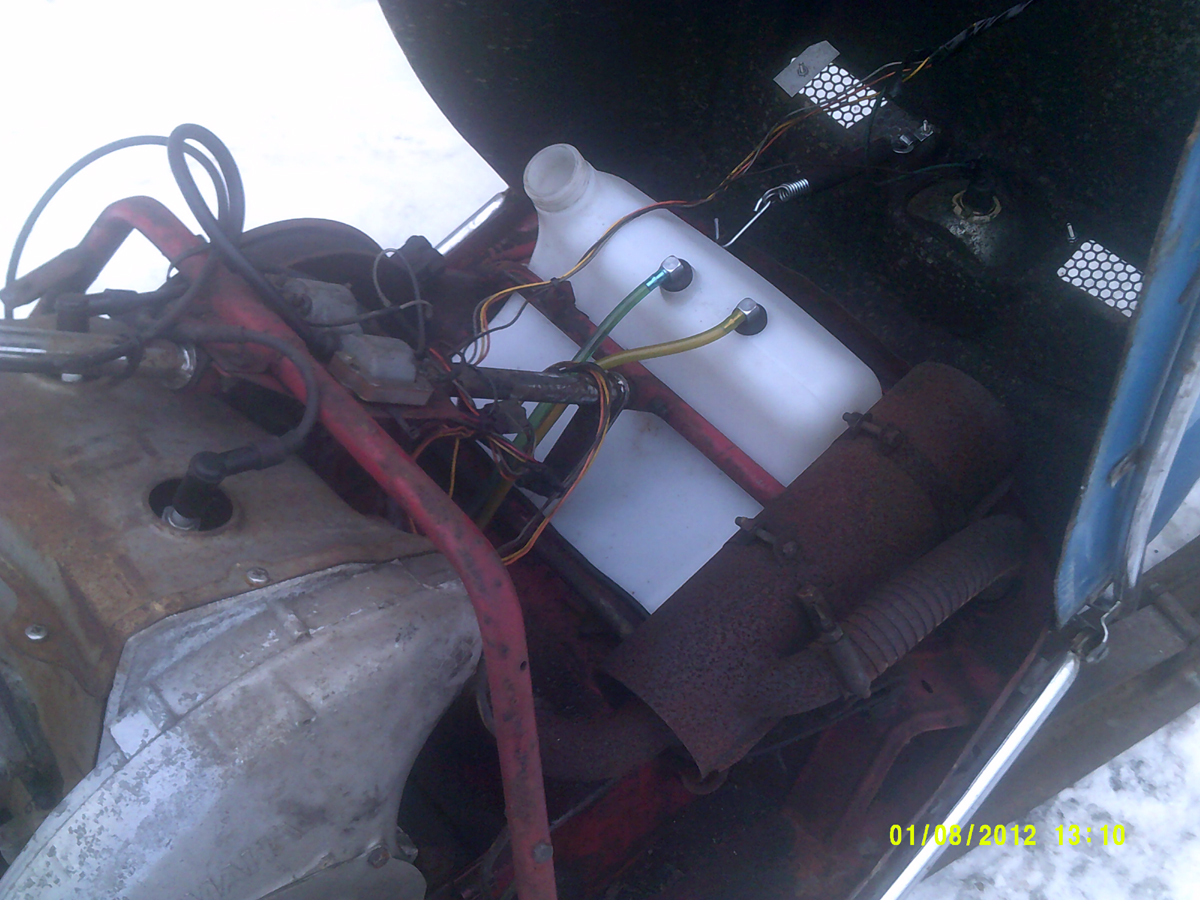
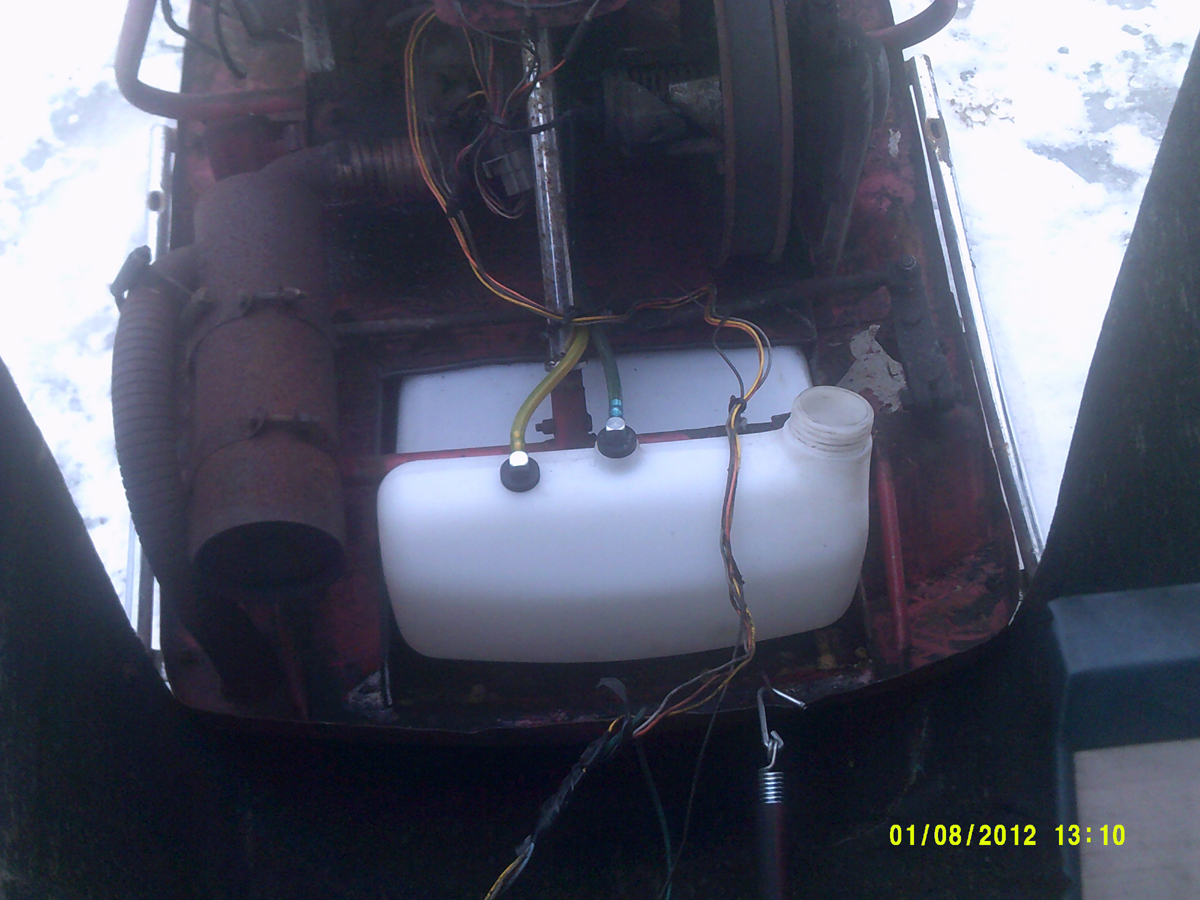
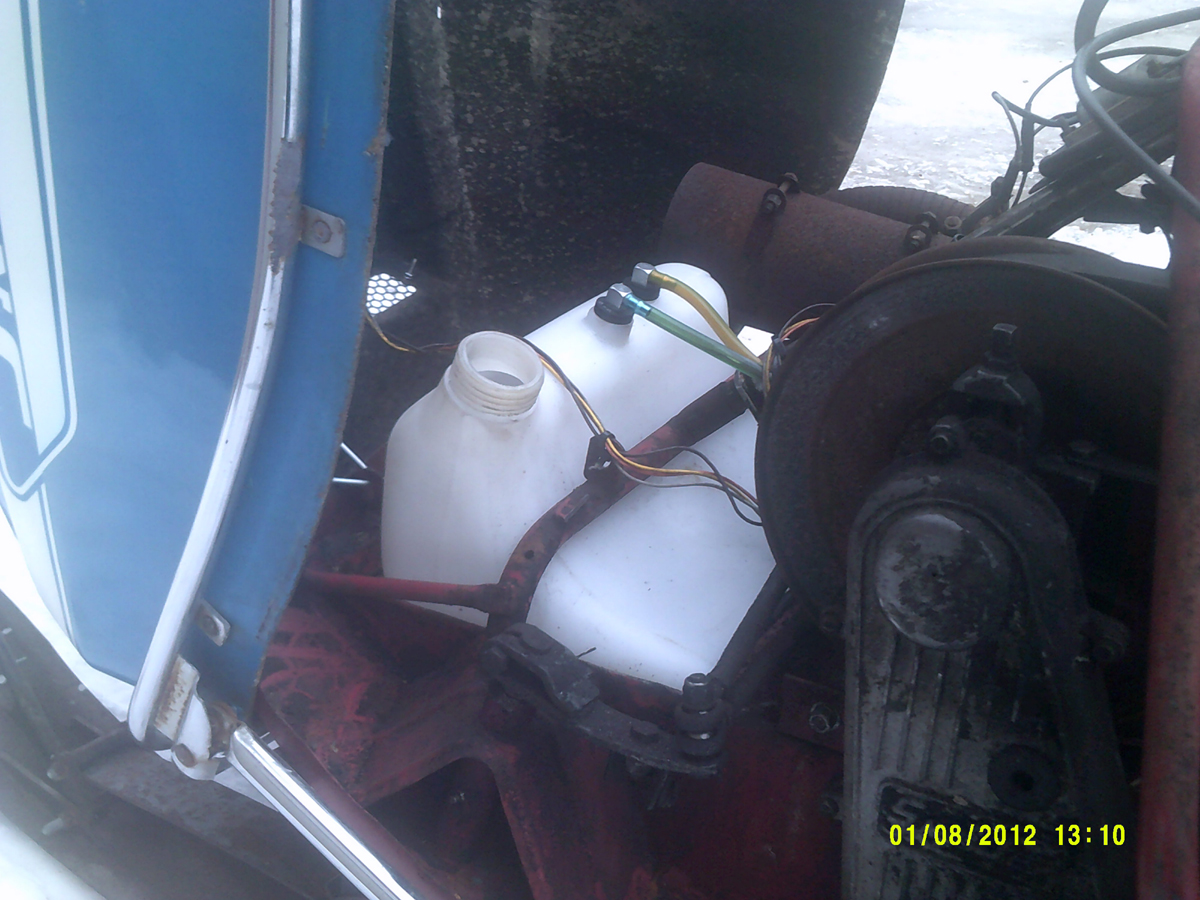
Another option would be to replace your metal rusty old gas tank with a plastic gas tank, all you
have to do is cut the top of the tank in front of the ski support . Drill a hole
in the 4 corners, then cut a line across the belly pan under the hole and 4
inches back on both sides. Pull the pan down so the tank can fit around the bend.
Once the tank is in, bend the pan back up and fit a plate over the pan using
self-taping screws. Just make sure the plate is wider than the tank. It is a
tight fit but it works great. Lon Wagner did this to his 72 Super Jet. Here is
what he had to say about it: The tank I used was out of an Elan and it will fit
in any Sno*Jet wide or narrow track. There was enough room on the throttle side
to route the gas line in through the old hole in the side and up to the new hook
ups. I sugest you do the same as it keeps the lines away from the exhaust. There
is room on either side but I had to tap [smack] the tank with a hammer to get it
around the bend . Once its around the bend it fits like a glove, you won't even
have to tie it down. Be very careful when attempting these modifications.
You have to be incredibly careful when dealing with these tanks. Any old fuel or even fumes can be very dangerous.
Take all pre-cautions necessary when cutting, drilling, welding or even inspecting these old tanks.
Here are a few photos from another Sno-Jet tank modification. This one was done by Dave Cox. He recommends when cutting out the top piece, leave a bit of extra material at the back and the sides, then fold it back on itself, this will help eliminate the sharp edge.
Any other sides/areas that are sharp, use an automotive door edge guard. The last thing he is going to do is add a heat shield between the tank and muffler. The tank he used specifically is one he sourced on ebay, Kimpex part #07-405 for a Ski Doo Elan 250 OEM # 571007500.
Overall, it cost him about $100 and an hour or so of his time. Great work Dave!